
How to Remove Background Noise from Vocals (5 Methods + 1 Shortcut)
You recorded a vocal take that felt great — performance, timing, emotion all there. But when you hit play, the recording sounds thin, noisy, and like it was tracked in an empty bathroom.
You're not alone. Background noise is the single most common problem in home vocal recordings, and it rarely has anything to do with how well you sing. It's the room, the gear, or the environment.
The good news: most noise on vocal recordings is fixable. This guide walks through five methods, from "do this before you record" to "clean it up after the fact," so you can pick the one that matches your situation.
First: Identify the Noise on Your Track
Not all noise is the same, and the method that fixes hiss won't fix room reverb. Play your recording back at a quiet moment (between phrases, when you're not singing) and listen for what you hear.
| What you hear | What it is | Best fix |
|---|---|---|
| Static "sss" background | Tape hiss / electrical noise | Spectral denoising |
| Low electrical hum (50/60 Hz) | Mains hum / ground loop | High-pass filter + denoiser |
| Echo / bouncing tail | Room reverb / untreated space | Acoustic treatment (prevention) |
| Rumbles between phrases | Computer fan, AC, traffic | Noise gate |
| Distorted top end | Cheap mic / clipping | Re-record, no fix |
Spend two minutes on this step. Picking the wrong method wastes more time than it saves.
Method 1: Fix It at the Source (Before You Record)
This is the cheapest, fastest, and most effective method — and it's free.
- Turn off the AC and fan while recording. Even a quiet room fan adds a low rumble that's almost impossible to fully remove later.
- Record in a small, furnished room. Walk-in closets full of clothes, bedrooms with curtains, and cars parked quietly all work better than empty living rooms. Hard walls = reverb.
- Get the mic close. Two fingers' width from the pop filter. The closer the mic is to your mouth, the louder your voice is relative to the room noise — and the easier it is to gate out.
- Use a cardioid mic pattern. Cardioid mics reject sound from the back, which is where your computer and AC usually are.
- Record 10 seconds of silence before you start singing. This gives any denoiser a noise profile to learn from.
If you do these five things, you may not need any of the other methods below.
Method 2: Noise Gate
A noise gate mutes everything below a volume threshold. When you stop singing, the gate closes and cuts the sound entirely — this kills fan noise, desk knocks, and room rumble between phrases.
How it works:
- Set the threshold just below your quietest vocal note
- Set attack fast (so it opens the moment you start singing)
- Set release longer (so it doesn't chop off the end of words)
When to use it: Noise between phrases, not continuous noise under your singing. A gate can't remove noise that happens while you're singing — it only closes the silence gaps.
Watch out: Too aggressive a gate makes your vocal sound choppy and unnatural, like you're singing in a tunnel. Set it gently and use the A/B comparison to judge.
Method 3: AI / Spectral Denoising
This is the method that changed home recording in the last few years. Instead of just cutting volume, spectral denoisers analyze the audio in real time, identify what's "voice" vs "noise," and subtract the noise frequencies while keeping your voice intact.
It works on:
- Continuous hiss under your singing (not just gaps)
- Mains hum
- Air conditioning
- Room tone that didn't fully go away
How it works in practice:
- Upload your recording — MP3, WAV, M4A, or FLAC
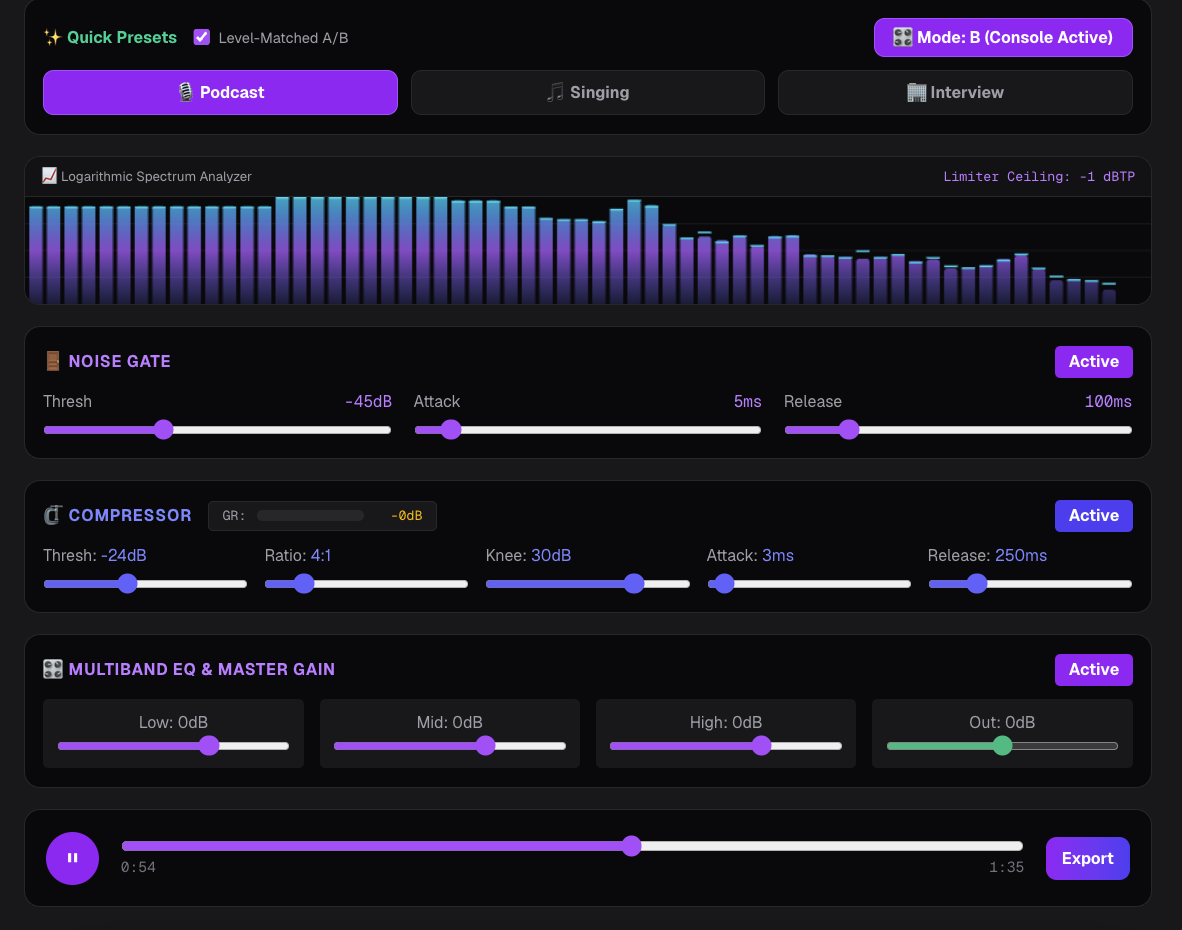
- Pick a preset — Podcast for speech, Singing for music, Interview for close-miked voice. The preset configures the entire chain: noise gate, spectral denoiser, multiband EQ, compressor, and limiter — no knobs to touch.
- The denoiser processes the file in your browser, locally
- Toggle level-matched A/B to hear original vs cleaned at equal loudness
This is what the Sonicaura vocal denoiser does. The whole process runs locally in your browser — your recording never leaves your device — and takes about as long as the track itself.
Method 4: EQ (High-Pass and Tonal Cleanup)
Even after denoising, there's often a thin layer of low-end mud that makes the vocal sound unclear. A high-pass filter takes care of this.
- High-pass filter at 80–100 Hz. Your singing voice doesn't have useful information below that range — that's just plosive breath, floor rumble, and proximity effect. Cut it and the vocal instantly sounds tighter.
- A gentle dip at 200–300 Hz if the vocal sounds boomy or "chesty."
- A small boost around 3–5 kHz for presence and clarity. Don't overdo it — 2–3 dB max.
EQ is surgical. You're carving out specific problem frequencies, not sweeping everything.
Method 5: Compression and Limiting
After cleaning the noise, your vocal may still sound uneven — some words jump out, others disappear. Compression evens that out.
- Ratio 3:1 to 4:1 for speech and gentle singing
- Threshold so you get 3–6 dB of gain reduction on loud passages
- Attack 10–20 ms so the consonants (plosives) still come through
- Release 100–250 ms so it resets between phrases
End with a limiter at around -1 dBTP. This keeps the output at a safe, consistent loudness so you don't have to worry about clipping when you drop the file into your DAW.
Which Method Should You Start With?
Here's the shortcut:
- Did you record with AC/fan running? → Start with a noise gate + spectral denoiser
- Does it sound like you're singing in a bathroom? → No plugin will fully fix that. Re-record in a smaller, softer room, then use light denoising
- Does it sound okay but muddy? → High-pass filter + gentle EQ
- Does it sound uneven in volume? → Compression + limiter
Most home recordings need Method 3 (spectral denoising) plus a little Method 4 (EQ). The full chain — gate → denoise → EQ → compress → limit — sounds professional, and you can do it in one pass with a preset.
The Fastest Option
If you don't want to open a DAW, install plugins, or chain together five separate processors, the free online vocal denoiser does the entire chain — gate → AI denoise → EQ → compressor → limiter — in one pass. Upload your file, pick a preset, and hear the cleaned vocal immediately. No install, no account, and your file never leaves your device.
For a deeper dive on what each control does, see the tool's built-in guide and FAQ below.
Frequently Asked Questions
Can background noise be removed from already-recorded vocals?
Yes. Spectral denoising (Method 3) is designed exactly for this — it separates voice from noise after the fact. The cleaner your source recording, the better the result.
What's the difference between a noise gate and a denoiser?
A noise gate mutes quiet sections between phrases. A denoiser subtracts noise frequencies even while you're singing. Use both: the gate handles gaps, the denoiser handles continuous noise.
Will denoising make my vocal sound robotic?
It can, if you push it too hard. Start with a preset and listen — if the vocal sounds underwater or has an artificial "swimming" effect, back off the intensity. Level-matched A/B comparison helps you judge fairly.
What file formats work?
MP3, WAV, M4A, and FLAC up to 500 MB. A lossless source gives the denoiser more detail to work with.
Is my recording uploaded to a server?
No. The processing runs entirely in your browser using Web Audio and WASM. The file never leaves your device.